Share Page
This page covers how to share your design as a link, how the link works, and how to place the image in an email, web page or other HTML source.
Sharing personalised images
Once your design is ready, you share it as a link. You can use the link anywhere that shows an image from a web address:
- Email platforms, such as Mailchimp, Klaviyo, HubSpot and Instantly
- Websites, blogs and landing pages, including WordPress and Shopify
- CRMs, portals and intranets, such as Microsoft SharePoint and SAP portals
- Apps and chatbots
- Automations, through Zapier or the API
Get your image link
Open your design and go to the Share page. It gives you two ways to add the image:
- Embed code: an HTML
<img>tag you can paste into an email or web page - Copy link: the image's web address on its own, for tools that ask for an image URL
You need to confirm your email address before you can share a design.
How the link works
Your image link looks something like this:
https://media.okzest.com/img?c=YourAccountId&i=YourDesignId&name=*|FNAME|*
| Part | What it means |
|---|---|
c | Your account |
i | The design |
name=*|FNAME|* | A dynamic layer, using its ID (name) and its merge tag (*|FNAME|*). There's one of these for each dynamic layer. |
When your email platform sends an email, it replaces the merge tag with each person's details, so Sarah's email contains ...&name=Sarah. When Sarah opens the email, OKZest creates her image and shows it to her.
In the embed code, the image looks like this:

And with merge tags from an email platform such as Mailchimp:

Test it in your browser
Paste the link into your web browser and change the values to see the result. For example, replace *|FNAME|* with Martin to see the image with the name Martin. If you remove a value, you'll see your fallback text.
Good to know
- Images are created when they're opened. An image only counts towards your plan when someone opens it, not when the email is sent.
- Always add alt text. It's shown when images are turned off, and read out by screen readers. You can set it on the Share page.
- Free plan images include a small "Made with OKZest" badge for as long as your free credit lasts and you have no paid credit. When the free credit runs out, a free plan serves a 1x1 pixel instead of your image. Paid plans have no badge.
- File types: the image uses the file type set in your design (JPG unless you change it). To override it for one link, add
&f=withjpg,png,webp,pdforpdf_letter. A PNG design with a dynamic background image is served as a JPG unless you add&f=png.
Where the image is created
For an email, your recipients receive the personalised link and the image is created when they open the email. For a web page, blog, CRM or portal, it is created when the page is viewed, using the data from your own database. If you have set fallback text for a merge tag, that text is shown when there is no data. All of this happens very quickly.
See the instructions for sites that work with OKZest for step-by-step instructions for each email platform.
Using the image on your website
A developer can use any language they wish to get for example the logged in users name. If you do not have a developer, here is the easiest way:
Have a link to your page that will contain the image and add ?name=Kevin e.g. https://example.com?name=Kevin
Add this JavaScript to your page (replacing the long URL with the one from your share design page):
<script type="text/javascript">
window.onload = function(){
  const params = new Proxy(new URLSearchParams(window.location.search), {
    get: (searchParams, prop) => searchParams.get(prop),
  });

  document.getElementById("okZest").src += 'https://media.okzest.com/img?c=AbOHw7ix50qyNXVf3fp9SQ&i=i-kdEaO6-Eqd4ZcLb8GXaA&name=' + (params.name ?? '');
}
</script>
Add this img tag:
<img id="okZest" alt="An image made just for you" />
Instructions for sites that work with OKZest
Aweber
In your image on OKZest, where it asks for ESP MERGE TAG, enter {{!firstname_fix}}.
Then on Aweber:


Go to Preview & Test

HighLevel


Hubspot
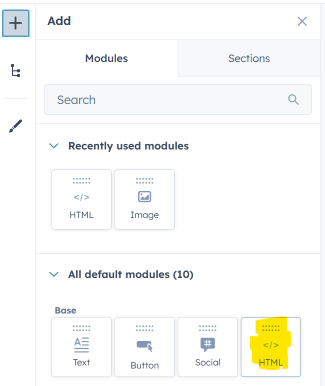
In the HTML block, paste the link we generate for you on our share page.
For the dynamic text, you will need to insert something like this:
{{ personalization_token('contact.firstname', '') }}
Instantly
In your image on OKZest, where it asks for ESP MERGE TAG, enter {{firstName}}.
Then on Instantly:


Paste the link we generate for you on our share page.
Klaviyo
In your image on OKZest, where it asks for ESP MERGE TAG, enter {{first_name}}.
Then on Klaviyo:


Press Preview and Test and the {{first_name}} will be replaced with proper data.
Mailchimp
In your image on OKZest, where it asks for ESP MERGE TAG, enter *|FNAME|*.
Then on Mailchimp:

Delete the HTML the code block added:

Paste the code we generate for you on our share page.


Mailerlite
In your image on OKZest, where it asks for ESP MERGE TAG, enter {name}
Then on Mailerlite:

Go to HTML mode:
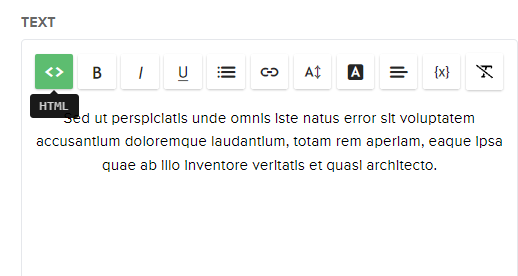
Remove the HTML that is there and paste the code we generate for you on our share page.
SendFox
In your image on OKZest, where it asks for ESP MERGE TAG, enter {{first_name}}
Then on SendFox:
You can find the personalization fields in the email editor's toolbar:

Switch to HTML view.
Paste the link we generate for you on our share page.
Smartlead
In your image on OKZest, where it asks for ESP MERGE TAG, enter {{first_name}}.
Then on Smartlead:


Paste the link we generate for you on our share page.
UChat
In your image on OKZest, where it asks for ESP MERGE TAG, enter {{first_name}}.
Then on UChat:


Zoho
In your image on OKZest, where it asks for ESP MERGE TAG, enter $[FNAME]$.
Then on Zoho:

Remove the HTML that is there and paste the code we generate for you on our share page.
Are there any sites OKZest does not work with?
The following sites do not support personalisation: